Network Visualization and Vulnerability Detection
Network visualization is the process of presenting a network of connected devices or nodes as a means visually indicate the connections between them. This can be done in many different ways and indicate each level of the Open System Interconnection (OSI) model or as a means to visually represent how data flows throughout ones network. Advanced networks are densely connected and creating visual representation of them allow for an intuitive means of exploring connected devices quickly and allowing for interactive data analysis to better understand its construct. This becomes particularly helpful when utilizing any Vulnerability Detection tools and needing to create an inventory of all systems on our networks, such as servers, desktops, switches, printers, or IoT devices.
Network Visualization and Vulnerability Detection tools Trade Study
During the CSOL 570 course we were tasked with varying assignments to research and test Network Visualization and Vulnerability Detection tools. These would later assist in the creation of our final paper which was a trade study of these tools, how they compared with one another both on paper and in a virtual lab. Additionally, to better understand how some vulnerabilities could be exploited we utilized a suite of Virtual Machines (VM's) to perform a multitude of information gathering, analysis, and attacks against a VM. Below are snippets from that work with additional topic areas that cover professional and ethical responsibilities when using them.
Open Source Network Visualization Tools
The objective of this final assignment is to compile each of the assignments from this semester into a comprehensive report that details the capabilities and configurations of my virtual lab as a security platform. Throughout this semester I had performed trade studies on both Open Source Network Visualization Tools and Open Source Vulnerability Scanning Tools. Below I will go over both trades and their results. As a security professional, it is very important to perform trade studies on tools you hope to incorporate into your environment. Outside of a cost perspective, the capabilities and any constraints should be identified throughout the trade. To determine which of the two open source network visualization tools, Zenmap or Nagios Core, meets the criteria of the trade.
I will review these tools in my home lab to design my network diagram. The trade will identify and select the most effective network security visualization tool based on the defined criteria for the evaluation. The selected open source network visualization tools will be downloaded and installed on the test lab environment and set to capture log data from the three running virtual machines. These results will be compared again against the criteria and an option will be selected. To ensure that the use of these tools was done with permission of the data owner and with clear guidelines of the objective.
Criteria for Evaluation and Tools to Evaluate
The following criteria will be used in evaluating the open source network visualization tools for the trade study:
-Installation and configuration difficulty
-Ease of use
-Amount of data that can be collected
-Support available
For this trade, the following two open source network visualization tools will be evaluated:
1. Zenmap https://nmap.org/zenmap/
-Official Nmap Security Scanner GUI
-Saves frequent scan’s
-OS detection
2. Nagios: https:/www.nagios.org/
-GUI for Unix
-Features link layer, IP, and TCP modes
-Supports multiple network topologies (Token Ring, WLAN, SLIP, and more)
Zenmap
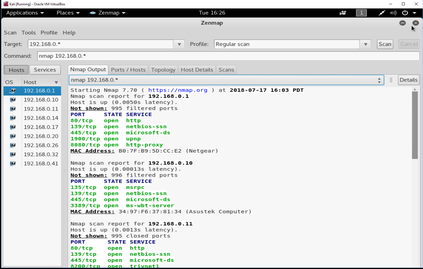
The steps to run Zenmap were very straight forward. Especially if running on current distribution of Kali Linux as its already installed and can be ran by opening a terminal and running “zenmap”. Once Zenmap gui is open, I gave a network range of 192.168.0. * to scan the entire range of that network segment. Then selected Regular scan from the profile window as I was scanning more than just a single virtual machine on that network.
The information Zenmap shows is very simple, but also very detailed. It’s not something that will any graphical design contests, but it does its job and well. Once a regular scan was completed I was able to see open ports on any computer or device on that segment, what hardware manufacturer they are, and its MAC address. The GUI also provided other tabs to view the detailed information differently. Such as; Ports/Hosts, Topology, Host Details, and Scans.
Nagios Core
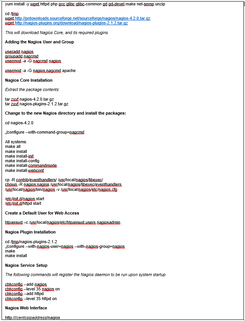
Installation and configuration of Nagios is a bit more complicated than Zenmap, as it is more of a robust tool and is a separate piece of software to install in comparison. For this trade I’ve installed Nagios Core on a new CentOS virtual machine. I followed the following instructions to install and configure Nagios Core here. This was more time intensive as there were far more manual steps to complete the install than Zenmap. While the available support and data that can be collected was more robust than Zenmap.
Installation and configuration of Nagios is a bit more complicated than Zenmap, as it is more of a robust tool and is a separate piece of software to install in comparison. For this trade I’ve installed Nagios Core on a new CentOS virtual machine. I followed the following instructions to install and configure Nagios Core here. This was more time intensive as there were far more manual steps to complete the install than Zenmap. While the available support and data that can be collected was more robust than Zenmap.
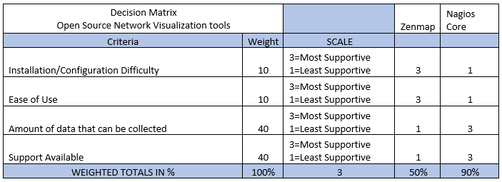
Decision Matrix
While Zenmap is considerably easier to install and configure, the amount of data that can be collected and utilized using Nagios Core far exceeds that of Zenmap. As that is expected as they are considerably different products. Nagios documentation however for installation is not up-to-date and required some investigation to resolve some of the issues specifically with httpd service steps.
While Zenmap is considerably easier to install and configure, the amount of data that can be collected and utilized using Nagios Core far exceeds that of Zenmap. As that is expected as they are considerably different products. Nagios documentation however for installation is not up-to-date and required some investigation to resolve some of the issues specifically with httpd service steps.
Open Source Vulnerability Scanning Tools
The objective of this trade is to determine which of the two open source vulnerability tools, NESSUS or Retina, meets the criteria of the trade. I will review these tools in my home lab. The trade will identify and select the most effective vulnerability tool based on the defined criteria for the evaluation. The selected open source network visualization tools will be downloaded and installed on the test lab environment and set to capture log data from the three running virtual machines. These results will be compared again against the criteria and an option will be selected.
The objective of this trade is to determine which of the two open source vulnerability tools, NESSUS or Retina, meets the criteria of the trade. I will review these tools in my home lab. The trade will identify and select the most effective vulnerability tool based on the defined criteria for the evaluation. The selected open source network visualization tools will be downloaded and installed on the test lab environment and set to capture log data from the three running virtual machines. These results will be compared again against the criteria and an option will be selected.
Criteria for Evaluation and Tools to Evaluate
The following criteria will be used in evaluating the open source network visualization tools for the trade study:
For this trade, the following two open source network visualization tools will be evaluated:
Nessus
The following criteria will be used in evaluating the open source network visualization tools for the trade study:
- -Cost
- -Complexity of available scans
- -Compatibility with CVE program
- -Update Support and Documentation available
For this trade, the following two open source network visualization tools will be evaluated:
Nessus
- Industry’s most widely deployed assessment solution for identifying vulnerabilities, configuration issues, and malware
- High-speed accurate scanning with low false positives
- Low total cost of ownership (TCO) $2,190 per year with unlimited IP addresses
- Discover network, web, mobile, cloud, virtual, Docker image and IoT infrastructure
- Report on vulnerabilities, compliance, benchmarks, and more
- Supports multiple OS types and their vulnerabilities, malware, and attacks
- Cost is around $1,200 with unlimited IP addresses (with limitations on Virus definition updates, File Access Control, and scheduling)
Nessus
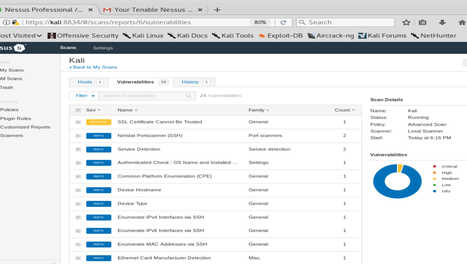
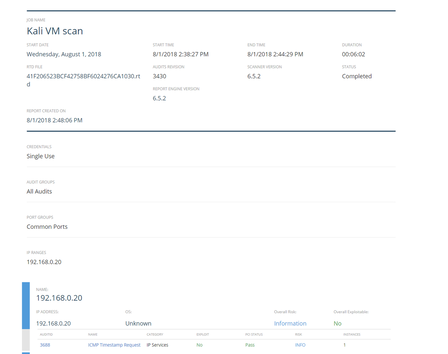
The steps to run install were straight forward. Requested a free seven-day trial from Tenable and an activation code with download link was sent to my student email. I followed the link to download the Debian installer and ran it on my Kali VM. Once installed and services are running; access the local host website of my VM and created a new user and password.
Then I entered my registration code and allowed Nessus to download the needed plug-ins. The scanner is very intuitive and easy to use. Their support and documentation were far more than that of Retina’s support site. Nessus UI, while not as minimal as Retina, does have a very simple design to it. I simply went to my scans, created a new scan with a name Kali, set for host with password as credentials for SSH and launched the scan. As with any vulnerability scanner it does require elevated privileges to scan systems and network devices. As such it is important that the individual(s) running the scan are trusted and their role in the vulnerability scanning is clearly defined and documented.
Retina CS
Installation and configuration of Retina CS however seems to only be available for a Windows Platform. I thought I had used it before on a Linux OS, but after registering for my free trial I was only able to locate Windows installers. So, I stood up a Windows VM to scan my Linux Kali VM. The set-up was very straight forward and a very minimal UI. The documentation for Retina CS was hidden behind a pay wall so I wasn’t able to access much other than basic install and Configuration documents. The site does boast extensive support, but during the free trial I didn’t see much in the way of what is available. Unlike the trial for Nessus.
Installation and configuration of Retina CS however seems to only be available for a Windows Platform. I thought I had used it before on a Linux OS, but after registering for my free trial I was only able to locate Windows installers. So, I stood up a Windows VM to scan my Linux Kali VM. The set-up was very straight forward and a very minimal UI. The documentation for Retina CS was hidden behind a pay wall so I wasn’t able to access much other than basic install and Configuration documents. The site does boast extensive support, but during the free trial I didn’t see much in the way of what is available. Unlike the trial for Nessus.
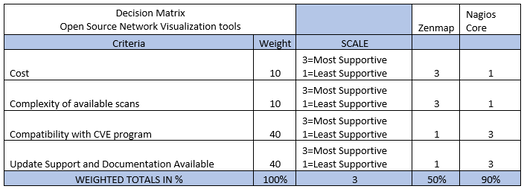
Decision Matrix
Even though Retina CS has an initially lower cost upfront, the add-ons quickly surpass that of Nessus. The functionality of Nessus and available plug-ins make it far more versatile and creates a very customizable way of scanning your entire infrastructure. Both are compatible with the CVE program, but Nessus makes it easier to link directly to the CVE article and provides the necessary adjudications required to become compliant. Where Retina CS does the same, but with far less detail and adjudications are vaguer. Support wise Nessus seems to be the easy winner here as you don’t pay extra for updates like with Retina CS and their support site is far more robust than that of Retina CS’s. The clear winner in my trade is Nessus.
Even though Retina CS has an initially lower cost upfront, the add-ons quickly surpass that of Nessus. The functionality of Nessus and available plug-ins make it far more versatile and creates a very customizable way of scanning your entire infrastructure. Both are compatible with the CVE program, but Nessus makes it easier to link directly to the CVE article and provides the necessary adjudications required to become compliant. Where Retina CS does the same, but with far less detail and adjudications are vaguer. Support wise Nessus seems to be the easy winner here as you don’t pay extra for updates like with Retina CS and their support site is far more robust than that of Retina CS’s. The clear winner in my trade is Nessus.
Virtual Lab and Attack Study
Virtual Lab
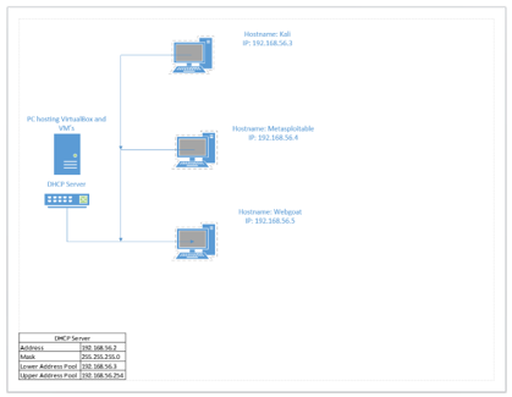
For my lab I utilized Oracle VirtualBox to manage my virtual machines hosted on my home lab server as shown in figure 1A. Depending on the labs need I would alter each virtual machine networking allowing for different connections or limitations. That would range from utilizing the hosts internal network card and distribute DHCP to bridging the hosts network card to further span vulnerability scans and more. Below I will go over each of the virtual machines in my lab and what each of their different roles are.
Kali
The main virtual machine used in this home lab would be the Kali Linux virtual machine. As Kali Linux has over 600 pre-installed penetration-testing programs at its disposal. Since this distribution is based on Debian, installing software will vary as it will not support installing base Linux RPM’s natively without additional configuration and software to deploy and install them.
Metasploitable
Throughout most of the labs and assignments throughout this course the Metasploitable virtual machine was used as a base machine to perform any attacks and/or exploits against. As the Metasploit Project is a computer security project that created the framework in this virtual machine to be specifically designed for penetration testing and more.
Webgoat
Having Kali and Metasploitable virtual machines were a must, but I also needed a virtual machine that could be used for web application learning. Enter Webgoat. This virtual machine was created on a vanilla CentOS 7 distribution with Webgoat
installed on it. Having something like Webgoat deployed in a virtualized lab used for penetration testing and learning more about web application vulnerabilities was invaluable.
The details of the security tool-kits, attacks executed, and their results can be found in detail in my full report linked below.
CSOL 570 Reflections
Throughout the remainder of the assignment, I would utilize Surveillance and Reconnaissance methods to test and perform varying attacks such as; dictionary attack against a hosts SSH service, launch an exploit payload against a vulnerability in a web service, identify open ports on a host then eavesdrop on communications between two hosts, and also identify hidden SSID from a wireless network. All of which were extremely important in enforcing the severity of damage tools like these could inflict if used for nefarious purposes. Setting up this lab was one of the most interesting and frustrating ones I’ve ever done. Most of my troubles were around attaching a USB device that my Kali VM could see from VirtualBox. After I finished this lab I decided to learn and play more with the tool, but from my VMware lab I have at my home. Using that lab, I had zero issues connecting any of my USB WIFI devices to my Kali VM.
The Kismet tool is very fun, and very powerful, for how simple the interface makes it to be. Given that I didn’t set up any robust security to my secondary network for this lab, I was able to gather enough detail with Kismet to shut off an IP camera I had running on that network. Using this tool, I would say is great for White hats and other security professionals to gather how tools like this can make even the least experienced people dangerous. Overall, each of the labs completed throughout this course further added to not only hands-on experience in penetration testing and vulnerability assessments, but drove me to go beyond the lab assignments to begin exploring the other tools at my disposal just from within Kali Linux. Needless to say, my eyes were opened even further when exploring these labs and instilled a new-found love for cyber security.
The Kismet tool is very fun, and very powerful, for how simple the interface makes it to be. Given that I didn’t set up any robust security to my secondary network for this lab, I was able to gather enough detail with Kismet to shut off an IP camera I had running on that network. Using this tool, I would say is great for White hats and other security professionals to gather how tools like this can make even the least experienced people dangerous. Overall, each of the labs completed throughout this course further added to not only hands-on experience in penetration testing and vulnerability assessments, but drove me to go beyond the lab assignments to begin exploring the other tools at my disposal just from within Kali Linux. Needless to say, my eyes were opened even further when exploring these labs and instilled a new-found love for cyber security.
Network Visualization and Vulnerability Detection References
Oracle VirtualBox
Kali Linux
Metasploit
WebGoat
Nagios Core
Zenmap
Nessus
Retina CS
Oracle VirtualBox
Kali Linux
Metasploit
WebGoat
Nagios Core
Zenmap
Nessus
Retina CS